My Mom called Friday afternoon and said "Chicken's on sale at Krogers, are you ready to can?". We've been waiting for whole fryers to go on sale so we could try canning meat. So early Saturday morning, I head up to her house with two stops at Krogers to pick up some chickens.
First let me say that this is not instructions on how to can chicken. Mom and I followed her canning book instructions to the letter. I recommend Ball's Complete Canning book, as new a version as you can get your hands on.
Upon arrival at Mom's, she already had her chickens cut up, so I started cutting up mine. We both cut off the leg quarters, wings and breasts. Mom had previously worked at a chicken processing plant and has a great way to cut off the breast meat with very little hassle. I promise to take pictures next time we do it so I can post the technique. We packed the drumsticks, thighs, wings and breasts raw into jars. Giblets (liver, kidney, etc...) were placed in freezer bags for later use.
The carcass's were placed in stock pots with celery, carrot and onion. The raw packed pieces, we added salt and pressured cooked according to the directions. After the stock finished cooking, we strained the stock off and then picked out the bones and vegetables from the meat. Mom wanted to put her meat, from the stock, canned with her stock. I just wanted plain stock canned, so I put my meat in freezer bags (I got 2 quart size bags 2/3 full). Stock and cooked chicken took alot less time in the pressure cooker.
Mom started with 5 whole chickens. She got 5 quarts (2 drumsticks, 2 thighs, and 2 wings in each), 6 pints (boneless breast meat in each), and almost 6 quarts with stock and meat (about 1/3 meat) in them.
I started with 6 whole chickens. I got 8 quarts (most had 1 drumstick, 1 thigh, 1 wing and half a breast, basically almost half a chicken), 6 pints of breast meat, 6 pints of stock and 1 quart of stock.
More Creative Storage.......
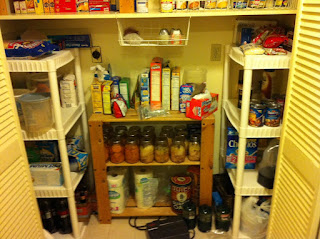
I am used to having a pantry. In my last house I converted a closet in the downstairs bedroom, which luckily was just off of the kitchen and we used the bedroom part of it as a computer room/office. That closet was only half the size of the pantry in the house before that one. Now I'm in a small one bedroom apartment and the kitchen doesn't have enough cabinet space for my dishes and pots and pans. We are hoping to only be here about 6 months and then buy a house to move into. After figuring the price of using a laundry mat verses buying used appliances. Our decision was to not buy and use the laundry closet for a pantry.
You see the wooden shelves? Those are from my old pantry. Those two pieces go together to make a tall shelf. I have two more tall shelves just like it in storage. But that built in shelf that goes all the way across prevented me from using them. I split that one and it works great. The wire baskets that stack, in the past they were on the top shelves of the wooden ones.
The plastic shelves in the bottom along the sides, I found at Walmart for 14.95 each. They work perfect for the space and was in my budget range.
This arrangement works well for trash can placement. There is no room in kitchen for the trash can, but I can push it in front of the bottom wood shelves and I can close the doors with the trash can inside.
Also, the little basket hanging from the painted shelf was given to me for free!
Now I have lots of room for food storage!


I love your little pantry area! Very nicely organized!
ReplyDelete